Listen to the road


Wednesday, February 20, 2013

And now for something completely different

This past summer a good friend visited to make Santos together. I ended up sawing the top
off mine and starting from scratch. Suddenly these figures began to multiply in our house in varying
s
stages of the process, all drying.

This book, Papier-Mache Today, has more real information about the process than any other
book I've seen.  I've been making my own adjustments along the way.


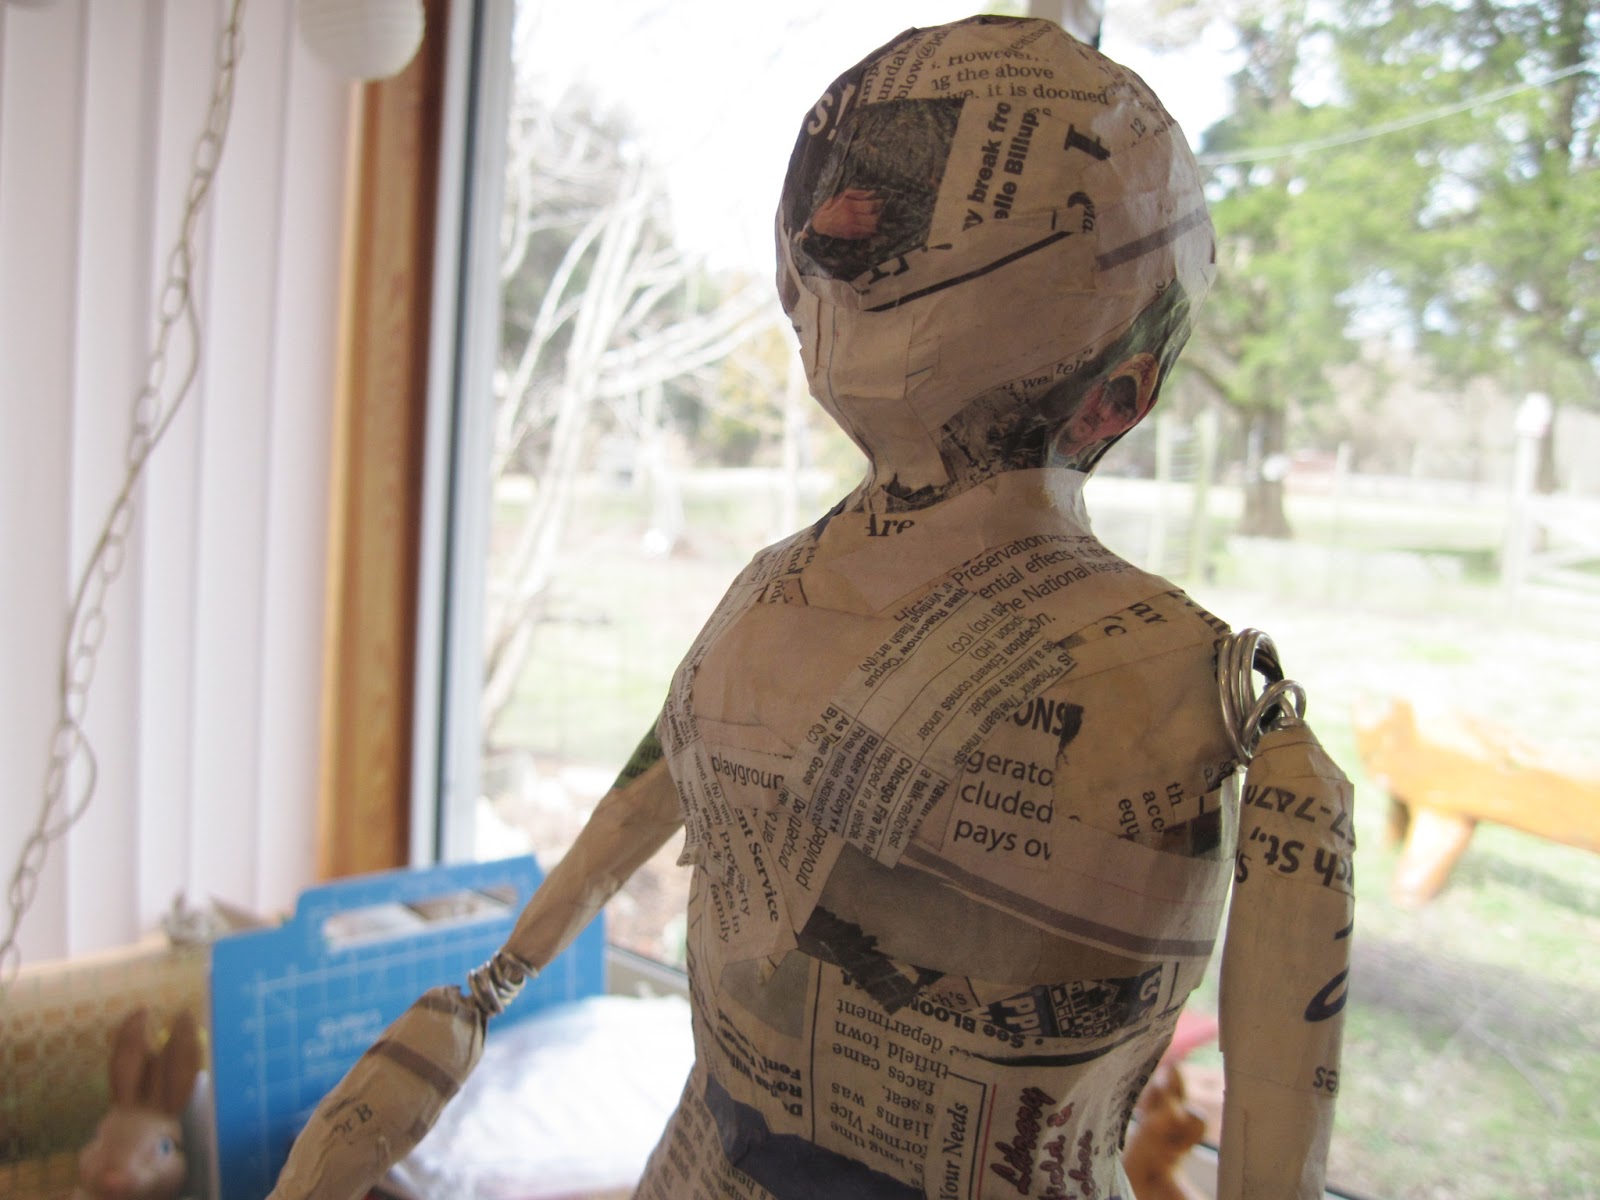
Like the way I wired drilled dowels to the torso so I can make gestures with the arms before
I freeze them with marine epoxy putty.


 Can you see the tall wooden candlestick I used as a base?  These guys develop their own
personality before my eyes.


This is the next to the last stage before painting. I used wallpaper paste (just mix a small amount
and keep adding warm water as it thickens) and white tissue paper which dries with an interesting
wrinkled surface.


I love the darkness of night behind them. Wonder what this guy's holding-a pizza? I think it's time
to make dinner.


Saturday, February 16, 2013

Stretching, mounting needlework-part 3

OK, so the mounting board is ready. One more press with a medium iron and light starch spray
around the edges of the applique.

Center and pin/stretch top edge across the top of fome backing.


Flip back the fabric and measure/cut the Stitchery Tape, press down the top side then
remove the carrier tape. This product worked great. When you first  press fabric down
you have a bit of time where it can be repositioned.The directions say it's permanent after
48 hours.


I stretched the top, then stretched/pinned left side and taped/positioned the right side.  Worked


around to the bottom and up left side.


I applied Stitchery tape underneath the back edge, stretching fabric edges in toward the frame.

Then, folded each corner and tacked down with a lightweight staple gun. I'm pleased with how
the back looks. This is on its way to a new home!

Monday, February 11, 2013

Stretching, mounting applique-part 2

After dinner went back to work on this.

Next the background fabric. I measured, sewed a hem and trimmed the
fabric to be wrapped around the foam core. Measured the edge of the hem to end right next to
the frame edge. Pinned/machine stitched first the top side then the bottom. (not stretched tight as sewing down the applique will take a bit of extra fabric length.)

***Note, later in this process I realized the fabric stretched more than I thought it would and I had to make another hem.   This is a learning experience as well as a sharing one ;)! Next time I'll probably
just leave extra fabric and hem later on.***

At this point left the sides with raw edges to be measured, cut and hemmed after the applique
was sewn down. Less chance of distortion then. Now back to the applique.


Trimmed/pinned the batting sandwich and hand sewed it to the back of the applique in a loose whip stitch with quilting thread.


I began sewing in the middle and worked out to each edge. This helped keep the stitches from
wandering off course and the tension smooth. The batting was sewn around all four edges, (I kept checking that the 'sandwich' looked smooth from the front-no rippling or distortion). Top, then bottom, then the sides.

Next centered the sewn applique/batting sandwich on the backing cloth.


First centered the top edge along the top edge of the hemmed backing fabric. Double checked that the edge of the backing fabric's hem would wrap and end at the edge of the frame on back.

Using a tiny running stitch, I sewed  the applique to the backing, (from the center out). Top edge first, then the bottom edge, last the sides.

These very tiny stitches showed on front so I changed thread colors to match each area of color.


 This is where I am this morning with the applique sewn down and the backing cloth stretched over
fome core backing with pins .

If I have time later on I'll show how this mounting tape works. Think I'll practice on
a sample first. I usually don't like glues and adhesives if I can figure out a sewn way.
Any suggestions? I don't like the look on the back with the edges sewn together.

It's supposed to be acid free/archival. I bought it in the 1990s and hope the sticky factor is
still active. Has anyone used this? Any warnings? I appreciate any information before
I use it. Online comments about it are positive. Off to see mom.


Sunday, February 10, 2013

Stretching, mounting applique, Part 1

This is an applique I made for my Temple. It's based on the Parable of the Herbs in the Lotus Sutra.
I think this is my favorite of all parables in the Sutra. Lately I've been worried about my parents'
health as they are both in their 80s. I try to live with gratitude each day and hope to have the grace
to be aware of how I can help. I made this in gratitude for all the support I get from my Sangha
and my practice.

I actually finished this a couple of weeks ago. While driving and doing errands lately, the process of
how to mount and frame this has been in the back of my mind. Yesterday I took the plunge and
began the process using bits of what I've learned online and changing that a bit. I hope this helps you
make decisions on how to adapt this process to individual pieces.


I cut four sheets of fome core board about 1 1/2 inches wider and deeper than the applique. Then
I used double stick tape to make a sandwich of all the boards.

Just happened to have a frame from the thrift store the right size for the back of the fome core, about two inches smaller.  Used wood glue to attach the flat side of the frame to the back of the fome core.
Left it overnight with books on top for a good seal. The front of the applique is fragile with beads so
I attached hanging hardware at this point.

Next, I cut three layers of cotton batting (a bit smaller than the actual applique) and sewed along the outside edges using the
longest stitch setting. I want the applique itself to have a bit of padding and will position
this behind it when I sew it to the backing fabric.
I thought the background fabric would be a tough decision.This cloudy sky pattern jumped out
of the cabinet 2 minutes after I started looking. Love it when that happens!

I'll keep track of the next steps and post notes. It may be a few days. Happy Valentines Day!